
Methi Thepla (Fenugreek Flatbread)

I hope everybody had an enjoyable long weekend (if you live in the states)! I know that it’s been a week since I posted my last recipe! Sorry about that, life happens sometimes. But I was not going to let more than a week go by without posting if I could help it!
Let me introduce you to todays dish – Methi Thepla – roughly translated as Fenugreek Flatbread. Methi Thepla is a very traditional dish from the part of India my husband is from – Gujarat. Before I met him I had never had them before because they are not made where I am from in India. When we were in college together our families used to send meals for us to eat during the week. And we always used to share our homemade goods! I have such fond memories of the both of us sitting on the floor in our dorm room facing each other with a heated stack of these between us! =) It was only recently that I asked my husbands mother (who lives in India) for her recipe for this! I had been experimenting with Indian food quite a bit, and had decided that I was ready for this new challenge! Luckily my husbands mother is an AMAZING cook, so she very quickly sent me a detailed recipe through WhatsApp. I followed it to a T and I gotta say – it came out exactly the way I remember them. My husband was quite pleased also =). Since then I have made a batch almost once a week! These days we switch between these and the Breakfast Omelette Muffins for my husband to have in the morning!

If you have never had Methi(Fenugreek) before I would highly recommend giving it a try! It grows like a herb similar to cilantro in that its small leaves that are picked young and the stems are also edible, it can be used like cilantro which is used in moderation, or it can be used in a more similar way to Spinach. Where I come from, we mix it 1:1 with potatoes or carrots to make vegetable dishes. It has a distinct bitter flavor. But it’s not an unpleasant bitter, it’s a really subtle pleasing bitter flavor. It’s really something difficult to describe. (I’m still working on my descriptive words!) haha. Most likely if you have ever eaten at an Indian restaurant you have had it unknowingly. In dried form it is used more like a herb. At the end of cooking a savory dish we sometimes add a pinch of Kasoori Methi (which is dried methi). If you ever smelled the Kasoori Methi you would recognize the scent form Indian restaurants. Fresh Methi is not so easy to find. I have never seen it anywhere other than a South Asian grocery store. It is also only sold fresh, at least where I live, when it is in season – which just so happens to be right now. Luckily you can also find it in the freezer aisle of any South Asian grocery store. When I started making these, Methi (Fenugreek) was not in season, so I just got used to making it with the frozen kind. That is the kind that is used in this recipe. If for some reason you cannot find Methi anywhere, you can probably sub Spinach for it. It won’t come out the same flavor, but it will probably be its own variety of delicious =). If you are really adventurous you can also try growing Methi, according to my husband it’s actually quite easy. I had a failed experiment trying last year, but I think I was just doing it totally wrong. The seeds are super easy to find since they are also used commonly in Indian cooking, you can find them on Amazon here. It needs to grow for a few weeks before you can start picking it. Apart from the amazing flavor that Methi imparts to any dish it is included in, Methi also has LOADS of health benifits, you can read up on that here.

Right before writing this blog post, I did a quick google search on Methi Thepla (to make sure I was spelling it correctly, haha) and I noticed first that everybody’s thepla’s came out perfectly round which was shocking to me, but then I also noticed that right there in the description, they mention that they make it with whole wheat flour only. After I saw that, the shape made sense. This recipe, the one my husbands mother sent me, uses primarily Indian Millet Flour with just a little bit of Whole Wheat Flour. It’s not so easy to shape this. Frankly I was just glad that it all stayed together while I was making it, the shape does not affect the flavor at all. I have never tried this made with only whole wheat flour. Sounds more like a Parantha at that point (which is a common flatbread where I come from in India), I have a feeling the more authentic way to make it is with Bajri (Indian Millet) flour but feel free to correct me if you know better in the comments. So if you are going to make this, I highly recommend getting your hands on it. Luckily you can find it on Amazon here.
There are a few more Indian specific ingredients in this recipe, but I will talk more about them as they come up in the recipe – for now, let me walk you through the process of how to make these!
 First things first, I wanted to show you what the frozen Methi(fenugreek) I buy looks like. This is also the Bajri Flour
 that I use. I don’t believe that Indian millet is the same as the kind that you would buy in a regular health food store.
 So first you want to measure out 200g of the frozen methi(Fenugreek) in the packet I buy, that comes out to 4 cubes. Make sure its in a microwave safe bowl because we are going to stick the bowl in the microwave for about a minute. We want the cubes to be just thawed. They may still hold their shape but if you press them they will fall apart. Once they are out of the microwave break them up with your hands. If they are still too frozen, put them back for another 20 seconds and then try the same thing. Once it can break up, just leave it out while we prepare the rest of the ingredients. By the time we are ready for the methi it should be soft enough.
 While the methi is thawing, we will get our flours together. This flour is a mix primarily of Bajri (indian millet) flour, with a little bit of whole wheat flour. (the exact measurements are in my recipe card at the bottom of the post). Mix these together thoroughly.
 next we want to get our garlic/ginger/chili pepper paste ready while the methi is thawing. So chop up a little ginger, a couple of cloves of garlic and indian chili pepper (thai chili peppers can be subbed) into smaller pieces.
 Add them into your Mortar and Pestle
 one by one and smush them thoroughly until it creates a paste.
 Next we want to add the remaining dry ingredients to our flour mixture. Those would be Salt,Sesame Seeds
, Ajwain Seeds
(which are another common ingredient in Gujarati cooking, it has a peppery flavor), and Haldi (Turmeric) Powder
. Mix those all into the flour thoroughly, then add the oil and mix it in roughly, it wont look like you did much, but as long as there are little clumps of oil spread out its good.
 Now your Methi should be thawed nicely. To that we will add our other wet ingredients. We will add a tablespoon of yogurt – I like to use Greek Yogurt. A tablespoon of Jaggery (Gur)
 – which is an non-centrifugal cane sugar that is commonly used in all of India – you can read up on its health benefits here. If you don’t want to use it or don’t have it, you can probably sub in brown sugar as a quick fix although it wont be the exact same. Lastly we will add in our freshly made chili-garlic- ginger paste. Mix everything together so that you cannot distinguish one ingredient from another. You may need to use your hands to melt the jaggery into the rest of the mixture. If your jaggery is drier, you may want to heat it up with a little bit of water to help soften/dissolve it and then add it to this. (we will be adding water in couple minutes so you wont be changing anything to add a little first to the jaggery.
 The next step is to combine the wet and dry ingredients. For this step you will need to use your hands. You need to knead in the wet ingredients as best as you can, it will most likely still be dry, that’s okay, once you know you have mixed it as best as you can, then you can add a little bit of water at a time until you get a dough ball that is on the wetter side. See below.
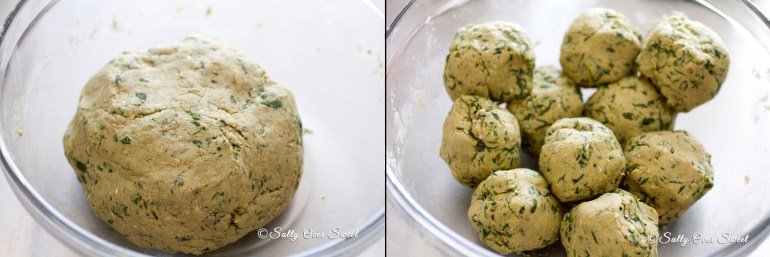 Your dough should look like this when it is all done. You are not trying to over-knead it to develop any gluten, since there is just a little bit of wheat flour in it, we just want it to all come together. Once you have a nice dough ball, we will split it up into 10 little balls. Each ball should weigh around 70g the size of small lemons. If you do not have a kitchen scale I highly recommend getting one. You can find the one I use here
.
 Now that we have all of our individual dough balls ready, we can set up our rolling station. You will want an area to roll, a rolling-pin, and a container or bowl/plate on the side with more flour in it (I use AP flour, but you can use wheat flour, or even the Bajri flour). I use this really nice roti rolling circle that my husbands mother got for me from India. it just raises the area a little and makes it a little easier to roll This
 is very similar to what I use. But you can use any surface you want. A silicone mat, or your counter-top even as long as its clean. My mom uses the countertop to do all of her rolling. So everybody has their own preference. If you have never rolled roti’s before then this may be new for you. Since I needed 2 hands to roll, I couldn’t photograph as I was doing it, but let me verbally walk you through it, its pretty simple. First we dip our individual ball in the extra flour we have kept on the side, along with flouring our work surface. After that you can begin to roll. Soon after you begin rolling, you will notice that it will quickly get sticky. This is a very sticky dough. gently place the flattened disk back into the flour that you have on the side coating both sides with a layer of flour. Place it back onto the rolling surface, and continue rolling it until it comes out to your desired thickness. My husband likes them as thin as I can get them, but you don’t have to do that. Roll it out as much as you are comfortable. When you start rolling, make sure you heat up a large frying pan on medium heat, don’t start rolling until the pan is hot.
 Don’t worry about it not being perfectly round. In this house we like to call that “rustic” =). Because I roll it out so thin, mine ALWAYS gets stuck to the rolling surface. I use a Bench Scraper
 to help gently scrape the dough off the rolling surface. then I use that same bench scraper to help transfer my rolled out dough to my heated pan. Once the dough is rolled out I add a teaspoon of oil to the pan and then gently place my rolled out dough on top.
 When the Thepla (flatbread) is cooking you will know its time to flip, when the edges start to get slightly golden and it no long has a “raw” look to it. Before flipping it, brush/spread some more oil on the uncooked side and then flip it and continue to cook it. It should take around 3-4 minutes per Thepla (flatbread).
 When you finish cooking each Thepla you will want to transfer them to an insulated container. Something like This
 would work well. If you eat them right away they will taste very dry. But if you leave them in this insulated container for 20 minutes, the steam will make them nice and soft and the perfect texture. If you do not have an insulated container, and you do not want to get one, you can also stack them on a plate and cover them with a large glass bowl after each one comes out. It’s important to trap the heat so that they can steam properly. My husband doesn’t like butter on his, so I add mine afterwards for myself, but you can also add butter or ghee at this point onto them when you put them into the container.
 After 20 minutes of steaming they are done and ready to serve! =) You can eat them by themselves, with butter, or even with yogurt (which I have here in the picture) These are commonly eaten as a breakfast or afternoon snack with coffee or tea. They are pretty heavy, so one person with an average appetite would probably only need 2 or at most 3 if they are eating them as a full meal. But one by itself is a sufficient snack or breakfast =).
I hope you give this recipe a try for yourself! Please be sure to let me know in the comments if you do! I would love to hear what you thought of it! Be sure to subscribe so that you can be notified when I post new recipes! (link in the sidebar). Follow me on Instagram @saltyoversweet (I also post a lot of Instagram stories of what I am making that day) and find me on Facebook (the link is in the sidebar). You can also tag me on Instagram @saltyoversweet if you make any of my recipes I would love to see! =)

- 250g - 2 1/2 Cups - Bajri (Indian Millet) Flour
- 50g - 3/8-1/4 cup - Whole Wheat Flour
- 1 Teaspoon - Chopped Ginger
- 2 Cloves - Garlic
- 2 - Indian Green Chili Peppers (Fresh) (Thai Chillies can be subbed)
- 1/2 teaspoon - Ajwain Seeds (Carom Seeds)
- 1/2 teaspoon - Haldi (Turmeric)
- 1 Tablespoon - Sesame Seeds
- 1 Tablespoon - Jaggery (Gur)
- 1 Tablespoon - Yogurt (I use greek)
- 2 Tablespoons - Oil - You can use any oil you prefer - I use Olive oil
- 1 Tablespoon - Salt
- 200g - 4 cubes - Frozen Methi (Fenugreek)
- Water - As needed
- Oil - for cooking (any neutral cooking oil)
- Extra Flour - For rolling
- Thaw methi cubes in the microwave for a minute- minute and a half. until the cubes can be broken easily in your hands - leave on the side to finish thawing.
- Make Ginger-Garlic-Chili Paste by smushing it together in a mortar and pestle until it comes to a paste. (keep on the side)
- Mix both Bajri and Whole Wheat Flour together.
- Add remaning dry ingredients - salt, sesame seeds, haldi, ajwain and mix in thoroughly.
- Add oil and mix in until little clumps form.
- Methi should be sufficiently thawed now, add yogurt, jaggery and ginger-garlic-chili paste to the same bowl. Mix together with hands. Heat from hands may be required to melt the jaggery into the mix.
- Mix wet and dry ingredients together as best as you can. If dough is still dry, add a water a tablespoon at a time until it comes together into a ball. Dough will be a little wet and sticky, thats okay.
- Split dough up into 10 equal sized balls - apprx 70g each.
- Heat a pan on the stove on medium heat.
- Set up your rolling station, and begin rolling thepla's (see blog post for detailed instructions).
- Once theplas are rolled, you can add some oil to the pan and place the rolled out thepla gently onto the oil (without splattering and burning yourself). Cook for 2-3 minutes until edges become slightly brown, and middle no longer has a raw look to it, then brush/spread a little bit more oil on top and flip. Cook for an additional minute to minute and a half on the other side.
- Once its done cooking, transfer to an insulated container and cover.
- When all of them are done, let them sit in the steamy container for 20 minutes before serving.
- After 20 minutes - Enjoy =)
- *I have not tried this recipe without the wheat flour but seeing how little is in there, I cant imagine that subbing gluten-free flour with it would make much of a difference to make this recipe gluten-free. If you try it let me know!
- *I'm not entirely sure the role the yogurt plays in the recipe since its such a small amount but if you are going to leave it out to make this recipe vegan, I would at least add some lemon juice or something to replace the "sour" the yogurt provides.
- *Make sure you let these steam for 20 minutes before serving, thats a really important step. They will be too dry and wont taste good if you skip this step.

Salty Over Sweet Food Blog is a participant in the Amazon Services LLC Associates Program, an affiliate advertising program designed to provide a means for sites to earn advertising fees by advertising and linking to Amazon.com.